The only piece of hardware required for this project is a Raspberry Pi
 , model 2B , 3B, or 3B+, and it's associated power supply
 and micro-SD card
 . I chose the Pi because it is inexpensive, and it's low power consumption makes me feel better about leaving it powered-on 24/7. As an operating system I am going to use the latest version of Raspbian Lite, which at the time of this writing is Raspbian Stretch. That being said, this same tutorial can be followed to setup an OpenVPN server on almost any Debian based operating system.
Before I get into the nuts and bolts of how to set this up, I would like to briefly discuss what a VPN server is, and why anyone would want one. If you just want the "how to", you can skip the first section below and go directly to the section entitled "Setting Up Dynamic DNS".
What is a VPN Server and Why Would I Want One
A VPN, or Virtual Private Network, allows a computer to run a VPN client in order to connect to a VPN server on a remote network, which makes it appear to the computer on the client side that it is directly connected to the remote network. It can reach machines on the remote network by using local (private) IP addresses, and can send all traffic from the remote computer to the VPN server through an encrypted tunnel, so that any potential eavesdroppers won't be able read it. VPN technology was originally developed as a way for remote workers to access corporate networks when traveling or working from home. While this application is still widely used, other properties of a VPN have broadened it's appeal, and made the VPN useful in several other scenarios.
One particular example of a common alternative use for VPN technology is subscription based VPN services, which have become very popular in recent years. These services allow you to connect to their VPN server from your home network (or elsewhere) in order to hide your internet traffic from your internet service provider, university, employer, government, or any other entity that may have an interest in what you are doing online. I want to make it clear that this is not what we are doing here. In the procedures listed below I will be setting up a VPN server on my home network, and subsequently connecting to it from remote locations. This will actually do the opposite of obscuring my internet traffic, as it will make everything I do, even when I am away from my house, look like it is originating from my home internet connection. This will hide your internet traffic from the remote network, which is handy if you are using an unsecure public network such as a coffee shop or hotel, but once it reaches your home network it will no longer be encrypted by the VPN. If your main intention is to completely obscure your activities on the internet then this article is not for you, and I suggest Googling "VPN service provider", which will provide you with a multitude of paid options for obscuring your internet traffic.
So if it won't obscure my internet activities, why would I want to host my own VPN server? Well to me, the most obvious convenience of a VPN server on your home network is the ability to access your media, files, and computers from a remote location in a secure manner. A VPN is not the only way to accomplish this, but it is one of the easiest and most secure methods. With my VPN connected, while I am away from home I still have access to all of my files and pictures, I can stream music and videos stored on my home server, and I can even work a Raspberry Pi connected to my home network from anywhere in the world.One particular example of a common alternative use for VPN technology is subscription based VPN services, which have become very popular in recent years. These services allow you to connect to their VPN server from your home network (or elsewhere) in order to hide your internet traffic from your internet service provider, university, employer, government, or any other entity that may have an interest in what you are doing online. I want to make it clear that this is not what we are doing here. In the procedures listed below I will be setting up a VPN server on my home network, and subsequently connecting to it from remote locations. This will actually do the opposite of obscuring my internet traffic, as it will make everything I do, even when I am away from my house, look like it is originating from my home internet connection. This will hide your internet traffic from the remote network, which is handy if you are using an unsecure public network such as a coffee shop or hotel, but once it reaches your home network it will no longer be encrypted by the VPN. If your main intention is to completely obscure your activities on the internet then this article is not for you, and I suggest Googling "VPN service provider", which will provide you with a multitude of paid options for obscuring your internet traffic.
As if the convenience of being able to access your home network from anywhere wasn't enough, there is another huge benefit of using VPN server. If you access the internet from public wifi you are opening yourself up to a tremendous amount of potential surveillance. In this world of identity theft and internet crime, it just seems like if there was a way to encrypt your traffic so other people couldn't see it over public wifi, then it would be the wise thing to do. If you have a VPN client on a laptop, tablet, or smartphone that can connect to a VPN server in your home, then all traffic over a public wifi network will be encrypted, and no one will be able to snoop on your internet activities over that wifi connection.
There are a few additional benefits to setting up a VPN, but these last ones won't be as useful to quite as many people as the first two. First, if you travel internationally, you may find that some internet services are not available in other countries, either because the government has blocked said service, or because the service provider does not offer said service in certain countries. In either scenario, connecting to a VPN server in your home country allows you to disguise your traffic, and make it look like it is actually coming from your home. Similarly, some universities and workplaces filter internet traffic to stop students or employees from viewing content that they believe to be inappropriate. While well meaning, sometimes these filters block access to sites that you may have a valid reason to visit. If you first log onto your VPN server at home, all traffic is then encrypted from the client computer to your server, bypassing any filters or firewalls that may have been implemented by said institutions.
Now, let's get down to setting up our VPN.
Setting Up Dynamic DNS
Before I can actually set up the VPN Server, I first need to set up a DDNS server to point to my home IP address. This is because most internet service providers issue their residential customers a dynamic IP address, meaning it changes from time to time. To get around this inconvenience, we can set up a free DDNS service that assigns a host name to my home IP address. I will then set up a DDNS client on the same Raspberry Pi that will contain the VPN server, which will keep an eye on my internet-facing IP address, and inform the DDNS server when it changes. This keeps your internet hostname pointing towards your current home IP address at all times.
For this implementation of my VPN server I am choosing to use No-IP as my free DDNS service. I have been using them for years, so I feel OK about recommending them. The one downside to their service is that if you use a free account, you have to verify the account every 30 days. If this is too inconvenient for you, please feel free to shop around and pick any free DDNS service you prefer. Just be aware that this section of the tutorial is specific to No-IP, so the steps will likely vary if you use a different service.
The first thing we need to do is to go to no-ip.com and register for a free account. Once done, directions for downloading, installing, and setting up the client program can be found at https://www.noip.com/support/knowledgebase/installing-the-linux-dynamic-update-client/, but it was such a quick and easy process that I will also list those directions here:
Navigate to /usr/local/src/
cd /usr/local/src/
Download the DDNS client
sudo wget http://www.no-ip.com/client/linux/noip-duc-linux.tar.gz
Unzip the client
sudo tar xf noip-duc-linux.tar.gz
Navigate to the newly created directory noip-2.1.9-1
cd noip-2.1.9-1/
Obviously the line above may change in the future. A quick ls will tell you the name of the newly created directory that you need to be inside.
Compile the client
sudo make install
You will then be prompted for the username and password for your account.
Next we need to create the configuration file.
sudo /usr/local/bin/noip2 -C
You will again be prompted for username and password. You will be asked a couple of additional questions; just press enter to select the default values.
And that's it. To run the DDNS client simply type:
sudo /usr/local/bin/noip2
Don't forget that we will want to start the DDNS client every time we boot the Pi, so we need a way to run the client on start-up. This can be done with Cron or editing /etc/init.d, but I'm just going to do this the easy way by editing /etc/rc.local. Simply open /etc/rc.local with a text editor and add the following line to the end of the file, but before exit 0 (if you are not familiar with using a command-line text editor, take a look at my short tutorial on the basics of using Vim)
sudo /usr/local/bin/noip2 &
So now your DDNS client is set up. If you go to noip.com and navigate to the My Account page, there is a box at the top that shows the number of hostname updates in the past 30 days. If is says more than zero then your client is working correctly.
cd /usr/local/src/
Download the DDNS client
sudo wget http://www.no-ip.com/client/linux/noip-duc-linux.tar.gz
Unzip the client
sudo tar xf noip-duc-linux.tar.gz
Navigate to the newly created directory noip-2.1.9-1
cd noip-2.1.9-1/
Obviously the line above may change in the future. A quick ls will tell you the name of the newly created directory that you need to be inside.
Compile the client
sudo make install
You will then be prompted for the username and password for your account.
Next we need to create the configuration file.
sudo /usr/local/bin/noip2 -C
You will again be prompted for username and password. You will be asked a couple of additional questions; just press enter to select the default values.
And that's it. To run the DDNS client simply type:
sudo /usr/local/bin/noip2
Don't forget that we will want to start the DDNS client every time we boot the Pi, so we need a way to run the client on start-up. This can be done with Cron or editing /etc/init.d, but I'm just going to do this the easy way by editing /etc/rc.local. Simply open /etc/rc.local with a text editor and add the following line to the end of the file, but before exit 0 (if you are not familiar with using a command-line text editor, take a look at my short tutorial on the basics of using Vim)
sudo /usr/local/bin/noip2 &
So now your DDNS client is set up. If you go to noip.com and navigate to the My Account page, there is a box at the top that shows the number of hostname updates in the past 30 days. If is says more than zero then your client is working correctly.
Installing OpenVPN on the Raspberry Pi
Before we get started, I would like to point out that there is an easier way to do this than I have outlined below. The PiVPN Project has written what seems to be a pretty decent script to install, set-up, and configure OpenVPN on the Raspberry Pi. From all reports this seems to be a secure and thorough way to do this, but I will not be using this method for two reasons. First, one of the biggest advantages to a VPN is the security it offers, and it seems like relying on a script downloaded from the internet to handle setting up a key piece of security on your network is putting a little too much trust in the integrity of random people on the internet. Secondly, I feel like it is important to understand how the VPN works, and what exactly it is doing on our network, and there is no better way to get a grasp on how the VPN functions than to go through setting up the config files and creating the keys and certificates it will use for authentication and encryption. So, lets get started.
I am going to assume at this point you have the Raspbian Lite operating system installed, and your Pi setup as a headless machine on your network with a static IP (or reserved DHCP address) so you can log onto the Pi via SSH. If you need any help doing the initial setup you can refer to the following tutorials for doing the initial set-up for the Raspberry Pi:
Burning Raspbian Lite to the SD Card
Headless Setup for the Raspberry Pi (only if you don't have a keyboard and monitor for setup)
Enabling the OpenSSH Server
Connecting to the Raspberry Pi Using SSH
Initial Setup for Raspbian Lite Using raspi-config
Setting a Static IP Address on the Raspberry Pi Running Raspbian Lite Stretch
Burning Raspbian Lite to the SD Card
Headless Setup for the Raspberry Pi (only if you don't have a keyboard and monitor for setup)
Enabling the OpenSSH Server
Connecting to the Raspberry Pi Using SSH
Initial Setup for Raspbian Lite Using raspi-config
Setting a Static IP Address on the Raspberry Pi Running Raspbian Lite Stretch
It should go without saying, but before we start, be sure to update and upgrade.
sudo apt-get update
sudo apt-get -y upgrade
Since OpenVPN exists in the Raspbian repositories, all we need to do to install it is:
sudo apt-get install -y openvpn
Before I go any further I would also like to point out that the OpenVPN project has done an excellent job documenting their product, and providing installation notes and set-up instructions. If you need instruction or clarification beyond what I have provided here, I strongly recommend checking OpenVPN's own site first before Googling elsewhere. Here is a good starting point: https://openvpn.net/index.php/access-server/docs.html
Setting Up Easy-RSA
Now the next thing we need to do is generate some certificates and keys. Keys and certificates provide basic security and encryption for a VPN. Instead of rambling here about how keys work, here is a link to OpenVPNs own documentation giving a brief description of how keys are used.
To do this we are going to use a program called Easy-RSA. This used to be inside the OpenVPN directories, and then for a period it had to be installed separately, but these days it is included with OpenVPN, but it has its own directory: /usr/share/easy-rsa. The OpenVPN documentation recommends copying this directory to another directory so that future updates of OpenVPN won't overwrite it. I'll take them at their word and go ahead and copy it to /etc/openvpn.
sudo cp -r /usr/share/easy-rsa /etc/openvpn/easy-rsa
Now lets make some keys! No, wait, we moved the file as suggested by OpenVPN, but we need to tell easy-rsa that we did that, so open the file vars in the new easy-rsa directory (*below I am using the text editor vim, which is not installed on Raspbian by default. Here is a short tutorial on how to use Vim in case you are not familiar with it)
sudo vim /etc/openvpn/easy-rsa/vars
and find the line that starts with export EASY_RSA= and change it to:
export EASY_RSA=”/etc/openvpn/easy-rsa”
We now need to change the line that starts with export KEY_CONFIG= to the following
export KEY_CONFIG=$EASY_RSA/openssl-1.0.0.cnf
Notice that not only did we point the file to the latest openssl version in the folder, but we also removed the quotes around the argument. I have no idea why this is necessary. It took me a while to find this solution, and it works, so I'll leave it at that.
While you are in the easy-rsa config file there are a few more things you can customize if you choose to do so, such as the default values used when generating the certificates, or the key size (should default to 2048), but since none of this is necessary, I won't cover it here. So let's move on to actually making some keys.
Creating Certificates and Keys with Easy-RSA
With Easy-RSA configured and ready, let's get down to business. The first thing we need to create is the CA, or Certificate Authority. This is your "master key" which will be used to sign all of the client certificates. First lets get to the right place and prepare the environment:
cd /etc/openvpn/easy-rsa
sudo su
mkdir keys
source ./vars
./clean-all
Now create the Certificate Authority and Key pair:
./build-ca
You will now be asked a series of questions. You can answer honestly or not, it doesn't really matter. The Common Name will be the display name for your certificate. I used the hostname of the Pi just because the questions suggested it, but it doesn't really matter. And that's it. You have now created a master Certificate Authority and Key, which will be saved as ca.crt and ca.key.
Next we need to create the certificates and private keys for the server and clients. To create the server certificate use the following command, where "server" is whatever name you want to use for the Raspberry Pi. Personally I just used the word "server" like it says below.
./build-key-server server
Once again you will be asked some questions, and just like in the previous step, your answers don't really matter, except for the Common Name, which needs to be the same as what you used to refer to the server in the above command (in my case I just called it "server"). It will also ask you for a challenge password. I typically just leave the password field blank, but you can use a password in addition to your keys if you would like added security. Also be sure to answer "yes" when it asks you if you want to sign the certificate, and when it asks you to to commit. That's it, we now have files named server.crt, server.csr, and server.key. Next we need to do the same thing for our clients.
./build-key client1
./build-key client2
./build-key client3
As before, strings client1, client2, and client3 above are just examples, and should be replaced by names that identify each client. You can name them whatever you want, just be sure to use the same string for the Common Name when you are prompted.
Once you are done with all of the client certificates/keys, we need to build Diffie Hellman parameters. In the interest of brevity I won't go into a long explanation of what Diffie Hellman parameters are or why we need them, and instead I will just place this Wikipedia link here, and encourage you to read up on a very interesting aspect of modern cryptography. Luckily, creating the key file is much easier than explaining it:
./build-dh
The last key we need to create is a hash-based message authentication code, or HMAC key. This is used to prevent Denial of Service (DoS) attacks against our VPN server. To create the HMAC key, simply use the following command:
openvpn –-genkey –-secret keys/ta.key
And now we are done creating certificates and keys. We will need to transfer a few of these certificates and keys to each client machine, but we will also need to send the client configuration file as well, and we haven't created that yet, so we will save all of that for a future section. For now we will move on to configuring the OpenVPN server.
Creating the OpenVPN Server Configuration File
Now it's time to create the Configuration Files for the server and the clients. This will be fairly easy as we are not going to start from scratch. OpenVPN provides sample configuration files that are a good starting point for creating the configuration files. They are located in /usr/share/doc/openvpn/examples/sample-config-files/. I should mention here that there are different types of VPNs that we can set up, and the config file we choose to start from will vary depending on the genre. The biggest choice to make here is whether to use a routed (tun) setup, or a bridged (tap) set-up. The main difference is that a routed set-up works on the network layer 3, so you will be assigned an IP in a different subnet than your home network, and will be provided with a routing table entry to point towards your home network. The bridged setup works on network layer 2, which means that your remote machine will be on the same subnet as your local network. While this seems desirable at first glance, the downfall of using a bridged setup is that you will be sending all of your Ethernet broadcast traffic over your VPN, so it is recommended that you use the routed setup unless you have a situation that specifically requires a bridged configuration.
Since I have decided on the routed (tun) setup, the sample configuration we want to start from is server.conf.gz. In order to use it we need to unzip it and put it in the /etc/openvpn/ directory:
gunzip -c /usr/share/doc/openvpn/examples/sample-config-files/server.conf.gz | sudo tee /etc/openvpn/server.conf
So we now have a server.conf file in the directory /etc/openvpn/. We need to edit it to reflect the settings for our server. Since everyone won't have the same requirements, I can't tell you what the best setting for your VPN should be, but I will tell you how I set up mine, and you can feel free to change these settings if it suits your situation. I will add comments to the below sample config file so you understand what must be changed, and what is optional. I am including all the commented-out lines just so you can see what is possible.
;local a.b.c.d # this line is commented out by default. If you have more than one network
# interface on your server, such as if you are going to keep your wifi active
# on a Pi3, then you need to
# uncomment this line and replace a.b.c.d with the IP address of the network
# interface that the VPN server will be running on
port 1194 # this is the TCP or UDP port that the server will listen on. Many people suggest
# changing this for security reasons, but I am not going to. I don't suggest opening
# port 1194 to the internet, since it will advertise to everyone that you are running
# a VPN server, but my port forward will listen for a different port, and then forward
# that port to internal port 1194, so this port will not be detected when doing a port
# scan from the internet
proto udp # if you have the need to use TCP instead of UPD then change this to proto tcp.
# otherwise leave this as it is.
dev tun # this creates a routed IP tunnel. If you want a bridged network (ethernet tunnel) then
# you would use dev tap here
;dev-node MyTap # this line only needs to be uncommented if you are using Windows to host
# your server. Since this is written for the Raspberry Pi, then this line will
# stay commented out
;ca.crt # These lines must be changed to point to the certificates and keys you just
;cert server.crt # generated for your server. If you followed this walk-through then these lines
;key server.key # should be replaced with the four lines below
;dh dh2048.pem #
ca /etc/openvpn/easy-rsa/keys/ca.crt
cert /etc/openvpn/easy-rsa/keys/server.crt
key /etc/openvpn/easy-rsa/keys/server.key
dh /etc/openvpn/easy-rsa/keys/dh2048.pem
topology subnet # this should be uncommented. The only reason that "subnet" is not
# the default topology is for backwards compatibility.
server 10.8.0.0 255.255.255.0 # This line configures server mode and supplies a VPN subnet
# from which an address will be issued to clients. If you don't know
# much about IP addressing and subnets then just leave this as
# is. If you want to change it feel free, just be sure not to use an
# IP address range that already exists on your local network.
ifconfig-pool-persist ipp.txt # this names the file to be used to keep a record of clients and
# their corresponding virtual IP addresses.
;server-bridge 10.8.0.4 255.255.255.0 10.8.0.50 10.8.0.100 # Since we are setting up a Routed
;server-bridge # IP type of VPN we will want to leave these lines commented out. Only
# uncomment and edit these lines if you are configuring a bridged (Ethernet) VPN.
;push "route 192.168.10.0 255.255.255.0" # These two lines will need to be uncommented and
;push "route 192.168.20.0 255.255.255.0" # edited if you want to be able to reach you local
# network from the VPN. For me that is half of the
# point of using a VPN, so I will use the following
# line to replace these two lines.
push "route 172.31.0.0 255.255.255.0" # Route to local subnet (replace with your local network)
;client-config-dir ccd # These lines are used to allow a static address to be
;route 192.168.40.128 255.255.255.248 # assigned to a client so that a subnet behind a client
;client-config-dir ccd # can reach the VPN. You would also have to create a
;route 10.9.0.0 255.255.255.252 # ccd file. We will not be doing this so leave it commented
;learn-address ./script # This line would allow you to create a script for managing firewall rules
# on a per-client basis. I will not be doing this, so we will leave it commented
push "redirect-gateway defl bypass-dhcp" # This line is commented out by default, but I have
# uncommented it in order to tell clients to direct ALL
# traffic through the VPN, which causes all trafic from
# client devices to be sent through the encrypted tunnel.
push "dhcp-option DNS 208.67.222.222" # I am choosing to uncomment these lines to push DNS
push "dhcp-option DNS 208.67.220.220" # options to the client. The only reason I am doing this
# is so that they will check the DNS table in my router
# to be able to look up local machines. If you don't need
# this you can leave it commented out.
client-to-client # This line is commented out by default. Uncomment it as I have if you want
# the clients on the VPN to be able to reach each other.
;duplicate-cn # This should only be uncommented if you will have multiple clients using
# the same certificate and key. This is not recommended.
keepalive 10 120 # This sends a keepalive ping every 10 seconds, and assumes the client is
# down after 120 seconds. For my purposes I will change this to 5 mins,
# so it will look like keepalive 10 300
;tls-auth ta.key 0 # This points towards the HMAC key we generated. If you followed the tutorial
# this line should look like the following:
tls-auth /etc/openvpn/easy-rsa/keys/ta.key 0
cipher AES-256-CBC # This line defines the cryptographic cypher being used. I will not be
# changing this line.
;compress 1z4-v2 # For security reasons we will leave this commented out
;puch "compress 1z4-v2" # in order to not allow compression
;comp-lzo
;max-clients 100 # If you feel the need to limit the number of clients you can do so here
user nobody # These lines are commented out by default, but I am going to uncomment them
group nobody # in order to reduce the OpenVPN daemon's privileges after initialization.
persist-key
persist-tun
status openvpn-status.log # this creates a short status file to show current connections
;log openvpn.log # By default OpenVPN logs will go to the syslog. By uncommenting
;log-append openvpn.log # these lines this default can be changed. I am not doing this.
verb3 # sets the verbosity level of log files. I am setting this to 4.
;mute 20 # if uncommented, this line would only allow 20 sequential duplicate logs.
explicit-exit-notify 1 # This line notifies the clients when the server restarts so that they can
# automatically reconnect
############ EOF ############
That's it. Save your changes to the config file, and you have now configured your OpenVPN server. Now let's setup the client side configuration file.
We now have the OpenVPN server fully configured, but we still have just a couple more things that need to be configured on the Raspberry Pi.
The first thing we need to do is to enable port forwarding on the Pi so that it will forward packets between the virtual interface and the Ethernet interface. To do this we simply use Vim (or any text editor) to open the file /etc/sysctl.conf
sudo vim /etc/sysctl.conf
Now scroll down until you find the line #net.ipv4.ip_forward=1 and remove the pound sign to uncomment it.
net.ipv4.ip_forward=1
Now save and close the file. Port forwarding is now enabled on the Pi.
The only other thing we need to do tell the OpenVPN server to start on reboot. We can start the server with the following command.
sudo systemctl start openvpn.service
That's it. The Pi is ready. At this point I like to do a final reboot, just for good measure.
So now we have setup our DDNS account and DDNS client, created our keys and certificates, completed our server and client side configuration files, and set the server to start on boot. All that we need to do now is configure our home router to forward VPN traffic to our server, and transfer our keys, certs, and config files to our client machines.
This section only applies if you have specifically set up a firewall. If you are using a typical home network set-up, or if you are unsure if this section applies to you, it is very likely that it does not apply, and you can just skip to the next section.
If you are using any sort of firewall, either as part of your router configuration, or in the form of a separate device, it will typically block all incoming connections unless you tell it otherwise. In order for any packets destined for the VPN server to get through, you must tell your firewall to allow them, by adding the external port for your VPN to the list of exceptions.
For instance, I use an access list on my router named BLOCK-ALL that I apply to all incoming traffic that did not originate from inside my network. In order to allow packets destined for the VPN server to get there, I need to edit my access list and add the following attribute:
permit udp any any eq 2345 log
At this point we should have everything setup on the server side of things. The only thing left to do is to set-up the individual clients. In order to do this we first need to copy several files to each of the client machines. The files that need to be copied are the client.ovpn, the ca.crt, the dh2048.pem, and the ta.key files, as well as the "client".crt and "client".key files specific to each client. We can transfer each file individually, or we can wrap them all up in a tarball to make for easy transfer, which is what I will do here.
First lets head on over to the directory /etc/openvpn/easy-rsa/keys which contains all the files we need to transfer. This directory is only readable by the root user, so before we will even be able to look inside we will need to sudo su. Once there we will need to create a folder for each client we have created keys for. For the sake of brevity I will only show this being done for one client, and I will call the client laptop1.
sudo su
cd /etc/openvpn/easy-rsa/keys
mkdir laptop1
Now we need to copy all the files we need for this client into the directory we just created.
cp client.ovpn laptop1/client.ovpn
cp ca.crt laptop1/ca.crt
cp dh2048.pem laptop1/dh2048.pem
cp ta.key laptop1/ta.key
cp laptop1.crt laptop1/laptop1.crt
cp laptop1.key laptop1/laptop1.key
Once we are finished the following command will wrap it all up in a nice little tarball for us.
tar -czvf laptop1.tar.gz laptop1
Lastly we need to move the file to the home directory for the user Pi, and then exit out of the root user.
cp laptop1.tar.gz /home/pi/laptop1.tar.gz
exit
Repeat the same steps for all clients you have created, and then we will move on to copying the files to the clients.
Once you have transferred all of the tarballs out of your home directory, it is good security practice to delete them. You still have the original copies in the folder /etc/openvpn/easy-rsa/keys if you ever need them again, and that folder is limited to be accessed by the root user only, so they are safer there.
This process is going to differ depending on the operating system, so I will layout procedures below for Linux, Windows, and Android.
First we need to install OpenVPN, which can be done easily since it can be found in the repositories. For Debian-based flavors of Linux such as Ubuntu or Raspbian use apt-get:
sudo apt-get install -y openvpn
Alternatively, if you are using Red-Hat based Linux such as Fedora or CentOS, you will need to use yum:
yum install openvpn
Now extract the files into the /etc/openvpn directory (the command below assumes the name of the file is linuxclient.tar.gz, and you are in the directory that contains the file. Obviously it is unlikely your file is named linuxclient, so change the file name accordingly):
sudo tar -xvzf ./linuxclient.tar.gz -C /etc/openvpn/
If you followed my directions regarding compression earlier, then your files are extracted into a directory with the same name as your compressed file, inside the /etc/openvpn directory. In this example that would be /etc/openvpn/linuxclient/ We now need to go there and edit the client configuration file named clinet.ovpn.
cd /etc/openvpn/linuxclient
sudo vim client.ovpn
You will now need to navigate down through the file until you see the following section:
ca ca.crt
cert client.crt
key client.key
And that should do it for the client configuration file. Go ahead and save your changes (:wq if you are using vim), and lets try it out.
To connect to our VPN, we will simply need to use the command openvpn followed by the name of our configuration file, which, if you followed this tutorial, should simply be client.ovpn. Since we should still be in the folder that contains the file, the command should simply be:
openvpn client.ovpn
And that's it, you should see the client connect. I like to keep this running in the foreground of the terminal, and just open a new terminal if I need to. That way when I want to close the VPN session I can just return to the terminal that started the session and use [Ctrl]-C to close the connection.
There is one last thing that I would like to recommend. To avoid having to navigate to /etc/openvpn/linuxclient/ every time you want to connect to the VPN, or having to type out the full path, we can save some time by copying the config file to our home directory. I would also recommend making the file hidden by preceding it with a period like so:
cp /etc/openvpn/linuxclient/client.ovpn ~/.client.ovpn
You can now start a VPN session from anywhere with the following command:
openvpn ~/.client.ovpn
Just a quick note, make sure you are not on the same network as your VPN server when you are testing this out. Often people want to test the connectivity as soon as the files are transferred and the client is set up, but if you test from inside the network where your server resides you will have connection issues.
For Windows we will need to download the OpenVPN client from the OpenVPN Community Downlads page:
https://openvpn.net/community-downloads/
Just grab the installer, which is the .exe file, and run it to install the OpenVPN client.
While we are downloading stuff, we will also need a program to unzip our tarball that contains our client files. I like to use 7-Zip, which you can download from the following website:
https://www.7-zip.org/
Let's also download Notepad++, which will make it easier to edit the config file than if we tried to do it with regular old Notepad. You can download the installer from their downloads page at:
https://notepad-plus-plus.org/download/v7.6.4.html
Now that we have all of our software downloaded and installed, let's get down to business. Find the tarball file containing the client files that you copied over to your Windows computer. It should be named something like windowsclient.tar.gz, except instead of "windowsclient" it will be whatever you decided to name this client. For the rest of this section, anytime you see "windowsclient" replace it with the name of your client.
To unzip the file, right click on it, hover over 7-Zip > and then select Extract Here from the sub-menu. This will create a file named windowsclient.tar. We now need to unzip it one step further, so right-click on the new file, and again select 7-Zip > Exrtract Here. This time you will end up with a folder named windowsclient that contains all the files you copied over from your OpenVPN server.
Open the folder windowsclient, and put it to the side. Now open a new File Explorer window and navigate to This PC > Windows (C:) > Program Files > OpenVPN > config. Now select all of the files in your newly created folder windowsclient and drag them over to the OpenVPN > config folder. Once all the files are moved over, you can go back and delete the files windowsclient.tar.gz, windowsclient.tar, and the now empty folder windowsclient, just for good housekeeping.
Now that we have all of the required files in the OpenVPN > config folder, we need to edit our config file. Right click on the file named config, and select Edit with Notepad++. Scorll down until you see the following two lines:
user nobody
group nobody
and add a pound sign at the beginning of each line so they look like this:
#user nobody
#group nobody
Continue to scroll down until you see the lines referring to your certificates:
ca ca.crt
cert client.crt
key client.key
You will need to edit these to point to the full path of the files you just copied over. This is a little tricky in Windows because Windows uses both spaces and back-slashes in addressing, and OpenVPN doesn't like either of these, so we need to use an escape character, which is also a backslash. If you have no idea what I just said, don't worry, you can just copy and paste the section below over the section referenced above, and change the words windowsclient to the name of your client.
ca C:\\Program\ Files\\OpenVPN\\config\\ca.crt
cert C:\\Program\ Files\\OpenVPN\\config\\windowsclient.crt
key C:\\Program\ Files\\OpenVPN\\config\\windowsclient.key
We will need to do the same thing to the line for the HMAC key, which looks like this:
tls-auth ta.key 1
and needs to look like this:
tls-auth C:\\Program\ Files\\OpenVPN\\config\\ta.key 1
That should be it for the config file, so go ahead and save the file, and close Notepad++. You can also close all of you File Explorer windows or browsers you still have open.
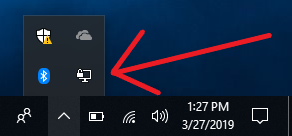 Now let's try to connect. Go to your system tray, which should be located in the bottom right hand corner of your screen, and look for an icon that looks like a monitor with a lock in front of it (you may have to click the up arrow in the system tray to see all of the icons). This is the OpenVPN icon. Right click on it and select Connect.
When you are done with your session, you can go right back to the system tray icon, right-click, and select Disconnect.
Just a quick note, make sure you are not on the same network as your VPN server when you are testing this out. Often people want to test the connectivity as soon as the files are transferred and the client is set up, but if you test from inside the network where your server resides you will have connection issues.
For Android, we will need to download the OpenVPN client from the Play Store. Simply search for OpenVPN, and the first search result should be OpenVPN Connect, by OpenVPN. This is what we want, so go ahead and install it.
While we are in the Play Store, we will also need to grab a text editor. I am going to use "Simple Text Editor by MaxiStar. I just picked this one at random and it seems to work well enough, but if you use another one you like better, by all means use it instead.
Lastly, we will also need something that can unzip our tarball. For this I use an app named 7Zipper. Go ahead and install it as well.
Now that we have all our apps installed, the first thing we need to do is unzip our tarball. For this tutorial we will refer to the file as androidclient.tar.gz, but your file will actually be whatever you named your android client. Going forward, anytime you see the words "androidclient", replace them with the name of your client.
Go ahead and open up the 7Zipper app. If you copied your tarball to your SD-card then select SD Card and navigate to your .tar.gz file. If you downloaded it from your Google drive, then you can find it under Download. Once you find the file, tap it, and 7Zipper should automatically get ready to extract the file, and should ask you for a target folder.
I like to put my folder in /sdcard so it is easy to find, but you can put it anywhere as long as you can find it later. To select /sdcard, tap the drop-down-menu, and then select Root (which is represented by / ). Now scroll down until you see the folder named sdcard, and select that. Make sure you have unchecked the box next to (Create Folder), and tap OK.
If you haven't done so previously, you may need to grant 7Zipper Write-access, and if so, you may find that you need to tell it to extract the file again after Write-access is granted. Don't worry, the second time is the charm.
Now that your files are extracted, you need to edit the config.ovpn file, so go ahead and open your text editor. If you are using Simple Text Editor, tap on the menu icon in the upper right hand corner, and select Open. You will then need to navigate to the file. If you stored in /sdcard like I did, then you will need to use the back button until you get to the directory / , then tap sdcard, find the folder with the name of your OpenVPN client and tap it.
Inside the folder with same name as your client you will have a file named client.ovpn. Tap in it to open it in the text editor. Scroll down until you find the following three lines:
ca ca.crt
cert client.crt
key client.key
All we need to do is to change the second two lines to represent our own client's name, and then add a fourth line for our DH parameters. The lines should look similar to the following, with the name of your client instead of androidclient:
ca ca.crt
cert androidclient.crt
key androidclient.key
dh dh2048.pem
That's the only change we need to make. Go ahead and save the file, and then close your text editor.
The last thing we need to do is to point the OpenVPN Connect app to our client file, so go ahead and open up OpenVPN Connect.
You will be presented with three options, and you want to pick the third, which is OVPN Profile. You will then be taken to a screen that says Import Profile, where you will need to navigate to your client.ovpn file. At the top of the navigation menu, there should be a button that says back. Click it until you can't go back anymore, and you should only have two options: Internal Storage and SD Card.
I know this will sound confusing, but just trust me: if you saved your files in a folder inside /sdcard, do not select SD Card, instead select Internal Storage. Scroll down until you see a folder with the name of your client and open it. Inside should be the file named client.ovpn. Tap it, and a checkmark will appear next to it, then select IMPORT. The next screen should have a field named Title, and it should be auto-populated with your ddns address from your config file. Click Add, and you are done.
You should now be presented with a screen titled OVPN Profiles, which is where you will now be taken when you open OpenVPN Connect. You will see your one profile listed, and it should say DISCONNECTED. To connect, tap the toggle button to the left of your profile. It's as easy as that. To disconnect, tap the toggle button again.
Phew, that's it! Wipe the sweat from your brow, you are done. Are you tired of reading? Because I'm tired of writing. I hope you enjoy your VPN server, and I hope this tutorial made setting it up a little easier. If you have any questions, comments, or recommendations for improvements, please leave them below in the comment section.
Until next time, have fun, and keep building!
Since I have decided on the routed (tun) setup, the sample configuration we want to start from is server.conf.gz. In order to use it we need to unzip it and put it in the /etc/openvpn/ directory:
gunzip -c /usr/share/doc/openvpn/examples/sample-config-files/server.conf.gz | sudo tee /etc/openvpn/server.conf
So we now have a server.conf file in the directory /etc/openvpn/. We need to edit it to reflect the settings for our server. Since everyone won't have the same requirements, I can't tell you what the best setting for your VPN should be, but I will tell you how I set up mine, and you can feel free to change these settings if it suits your situation. I will add comments to the below sample config file so you understand what must be changed, and what is optional. I am including all the commented-out lines just so you can see what is possible.
;local a.b.c.d # this line is commented out by default. If you have more than one network
# interface on your server, such as if you are going to keep your wifi active
# on a Pi3, then you need to
# uncomment this line and replace a.b.c.d with the IP address of the network
# interface that the VPN server will be running on
port 1194 # this is the TCP or UDP port that the server will listen on. Many people suggest
# changing this for security reasons, but I am not going to. I don't suggest opening
# port 1194 to the internet, since it will advertise to everyone that you are running
# a VPN server, but my port forward will listen for a different port, and then forward
# that port to internal port 1194, so this port will not be detected when doing a port
# scan from the internet
proto udp # if you have the need to use TCP instead of UPD then change this to proto tcp.
# otherwise leave this as it is.
dev tun # this creates a routed IP tunnel. If you want a bridged network (ethernet tunnel) then
# you would use dev tap here
;dev-node MyTap # this line only needs to be uncommented if you are using Windows to host
# your server. Since this is written for the Raspberry Pi, then this line will
# stay commented out
;ca.crt # These lines must be changed to point to the certificates and keys you just
;cert server.crt # generated for your server. If you followed this walk-through then these lines
;key server.key # should be replaced with the four lines below
;dh dh2048.pem #
ca /etc/openvpn/easy-rsa/keys/ca.crt
cert /etc/openvpn/easy-rsa/keys/server.crt
key /etc/openvpn/easy-rsa/keys/server.key
dh /etc/openvpn/easy-rsa/keys/dh2048.pem
topology subnet # this should be uncommented. The only reason that "subnet" is not
# the default topology is for backwards compatibility.
server 10.8.0.0 255.255.255.0 # This line configures server mode and supplies a VPN subnet
# from which an address will be issued to clients. If you don't know
# much about IP addressing and subnets then just leave this as
# is. If you want to change it feel free, just be sure not to use an
# IP address range that already exists on your local network.
ifconfig-pool-persist ipp.txt # this names the file to be used to keep a record of clients and
# their corresponding virtual IP addresses.
;server-bridge 10.8.0.4 255.255.255.0 10.8.0.50 10.8.0.100 # Since we are setting up a Routed
;server-bridge # IP type of VPN we will want to leave these lines commented out. Only
# uncomment and edit these lines if you are configuring a bridged (Ethernet) VPN.
;push "route 192.168.10.0 255.255.255.0" # These two lines will need to be uncommented and
;push "route 192.168.20.0 255.255.255.0" # edited if you want to be able to reach you local
# network from the VPN. For me that is half of the
# point of using a VPN, so I will use the following
# line to replace these two lines.
push "route 172.31.0.0 255.255.255.0" # Route to local subnet (replace with your local network)
;client-config-dir ccd # These lines are used to allow a static address to be
;route 192.168.40.128 255.255.255.248 # assigned to a client so that a subnet behind a client
;client-config-dir ccd # can reach the VPN. You would also have to create a
;route 10.9.0.0 255.255.255.252 # ccd file. We will not be doing this so leave it commented
;learn-address ./script # This line would allow you to create a script for managing firewall rules
# on a per-client basis. I will not be doing this, so we will leave it commented
push "redirect-gateway defl bypass-dhcp" # This line is commented out by default, but I have
# uncommented it in order to tell clients to direct ALL
# traffic through the VPN, which causes all trafic from
# client devices to be sent through the encrypted tunnel.
push "dhcp-option DNS 208.67.222.222" # I am choosing to uncomment these lines to push DNS
push "dhcp-option DNS 208.67.220.220" # options to the client. The only reason I am doing this
# is so that they will check the DNS table in my router
# to be able to look up local machines. If you don't need
# this you can leave it commented out.
client-to-client # This line is commented out by default. Uncomment it as I have if you want
# the clients on the VPN to be able to reach each other.
;duplicate-cn # This should only be uncommented if you will have multiple clients using
# the same certificate and key. This is not recommended.
keepalive 10 120 # This sends a keepalive ping every 10 seconds, and assumes the client is
# down after 120 seconds. For my purposes I will change this to 5 mins,
# so it will look like keepalive 10 300
;tls-auth ta.key 0 # This points towards the HMAC key we generated. If you followed the tutorial
# this line should look like the following:
tls-auth /etc/openvpn/easy-rsa/keys/ta.key 0
cipher AES-256-CBC # This line defines the cryptographic cypher being used. I will not be
# changing this line.
;compress 1z4-v2 # For security reasons we will leave this commented out
;puch "compress 1z4-v2" # in order to not allow compression
;comp-lzo
;max-clients 100 # If you feel the need to limit the number of clients you can do so here
user nobody # These lines are commented out by default, but I am going to uncomment them
group nobody # in order to reduce the OpenVPN daemon's privileges after initialization.
persist-key
persist-tun
status openvpn-status.log # this creates a short status file to show current connections
;log openvpn.log # By default OpenVPN logs will go to the syslog. By uncommenting
;log-append openvpn.log # these lines this default can be changed. I am not doing this.
verb3 # sets the verbosity level of log files. I am setting this to 4.
;mute 20 # if uncommented, this line would only allow 20 sequential duplicate logs.
explicit-exit-notify 1 # This line notifies the clients when the server restarts so that they can
# automatically reconnect
############ EOF ############
That's it. Save your changes to the config file, and you have now configured your OpenVPN server. Now let's setup the client side configuration file.
Creating the Client Configuration File
Just as we did with the server configuration, we are going to start with a sample client configuration file and edit it to fit our needs. Make a copy of the sample client configuration file located in /usr/share/doc/openvpn/examples/sample-config-files/. Whatever you do, don't copy it directly to /etc/openvpn, because the server will not know whether to open the server.conf or client.conf file. Instead I am going to copy it to /etc/openvpn/easy-rsa/keys/, since that is where all the other files that we need to copy to the client are stored.
sudo cp /usr/share/doc/openvpn/examples/sample-config-files/client.conf /etc/openvpn/easy-rsa/keys/client.ovpn
Now open it for editing:
sudo vim /etc/openvpn/easy-rsa/keys/client.ovpn
Instead of listing all of the entries in the client.conf file like I did for server.conf, I am only going to mention the lines that need to be changed.
First go to the line that starts with "remote", and edit it to contain the IP, or in this case the DDNS address of your server (which we set-up earlier in a previous section), followed by the port. Note, this is not necessarily the port that the server is listening on, but the incoming port on the WAN side of your router that it will then forward to the internal IP and port for your VPN server. We will go more in-depth with this in the section on Port Forwarding, so if you don't understand just use the port specified in your server configuration.
remote myddnsaddress.ddns.net 3456
Next find the lines that say "user nobody" and "group nogroup" and uncomment them, just like we did in the server configuration. (This does not apply to Windows clients, but instead of making two separate client config files, we will just go back and comment these lines out when we set up our client on a Windows machine.)
user nobody
group nogroup
The next thing that will need to be edited are the lines that start with ca, cert, and key. Just like in the server config, these lines will point to the certificates and the keys that we created earlier. However, assuming you created more than one set of client credentials, this part of the file will change depending on which client you are configuring, so I am just going to plan on editing the following three lines on each client.
ca ca.crt
cert client.crt
key client.key
We will also have to do the same thing to the line that starts with "tls-auth", and again I am just going to edit this on each client machine after it is copied over.
tls-auth ta.key 1
And that should be it. If you made other changes to the server side that I did not make on my server configuration, then there may be corresponding changes that need to be made on the client side, but if you knew enough about what you were doing to change the server configuration, then I trust that you will have no problem making the same changes to the client configuration.
Raspberry Pi Configuration
We now have the OpenVPN server fully configured, but we still have just a couple more things that need to be configured on the Raspberry Pi.
The first thing we need to do is to enable port forwarding on the Pi so that it will forward packets between the virtual interface and the Ethernet interface. To do this we simply use Vim (or any text editor) to open the file /etc/sysctl.conf
sudo vim /etc/sysctl.conf
Now scroll down until you find the line #net.ipv4.ip_forward=1 and remove the pound sign to uncomment it.
net.ipv4.ip_forward=1
Now save and close the file. Port forwarding is now enabled on the Pi.
The only other thing we need to do tell the OpenVPN server to start on reboot. We can start the server with the following command.
sudo systemctl start openvpn.service
However, we want to make sure that if the Pi is rebooted, then the VPN server will start on boot, so use the following command to ensure this happens:
sudo systemctl enable openvpn.service
That's it. The Pi is ready. At this point I like to do a final reboot, just for good measure.
So now we have setup our DDNS account and DDNS client, created our keys and certificates, completed our server and client side configuration files, and set the server to start on boot. All that we need to do now is configure our home router to forward VPN traffic to our server, and transfer our keys, certs, and config files to our client machines.
The end is in sight, just a little bit further...
Configuring Port Forwarding and a Static Route on your Home Router
This part gets a little tricky because I have no idea what kind of router you have, or how exactly to configure these settings on your particular router. Instead I want to briefly explain the concept of port forwarding and static routes so that you will know what you are trying to accomplish. That way when you log into your router you should understand what you are looking at. If you are completely unfamiliar with networking, you will likely need to do a little Googling to determine how to configure these settings on your specific router.
Keep in mind that the information below is meant to be a short summary to give you enough information to configure your router. By no means is this a full explanation of either port forwarding or static routes.
In order to understand port forwarding, I first need to explain network address translation, or NAT. Your internet service provider assigns you one IP address, but you likely have many internet-connected devises on your home network. To allow them all to communicate with other devices on the internet, your router uses NAT.
When a packet comes in from the internet it has the IP address of your router, along with a TCP or UDP port number. Your router examines this port number, and determines which internal device should receive the packet. It then forwards it on with the IP address of the internal device and the port number that the device is expecting.
If the communication originates from outside your home network, such as in the case of a VPN connection, the router needs to be told which internal device to send the packet to. This is the essence of port forwarding.
If your home router has a graphical interface, you will likely have a tab named Port Forwarding. On that tab there should be a table with columns for external port, internal IP address, and internal port.
The external port is the port that the packet coming from the internet will have when it reaches your router. This was set in the client configuration file above. In my example I used 3456, but you can use any number between 1024-49151 as long as your client configuration matches the external port on your port forward.
If you followed the configuration examples above, the internal port should be set to 1194, but this can be changed on your server configuration file if you so desire. The internal IP address should be set to the IP address of your Raspberry Pi that is hosting your VPN server.
Once you have entered these settings, you should save your changes, and then apply them.
If you are using a router running Cisco IOS as I am (in which case you probably don't need this tutorial), you should add the following commands to your configuration file (adjusting for your own port numbers and internal IP address):
ip nat inside source static udp 192.168.0.7 1194 interface GigabitEthernet0/1 3456
You will also need to add the VPN subnet to the list of internal NATed addresses. This is not something that 99.9% of you will need to worry about, but this caused me hours of troubleshooting the first time I implemented a VPN, so I feel as if I should mention it.
If your NAT is defined by an access list like so (this access list is named LOCAL):
ip nat inside source list LOCAL interface GigabitEthernet0/1 overload
Then be sure to add the following line to your access list:
permit 10.8.0.0 0.0.0.255
Routes are how a router knows which port to send a packet through. If you have a typical commercial grade home router, your router has two ports, a LAN and a WAN. Before you say "but I have a 4-port router!", or something of that nature, that is only because your router is actually a combination of a router and a switch, and the 4 or 5 ports for local devices are actually switch ports that are all connected internally to the LAN port on your router. But I digress...
Your router has a routing table that has two basic rules: #1 - send all traffic in the IP address range of your home nework (for example 192.168.0.0/24) through the LAN port, and #2 - send all other traffic through the WAN port. Simple enough.
The problem arises when you add your VPN subnet, which in this tutorial is 10.8.0.0/24. By default your router wants to send this traffic out the WAN port because it is not 192.168.0.0/24, but it really needs to go to your VPN server. Adding a static route is how we tell it to do this.
If your router has a graphical interface, you should have a tab named routing table or static routes. On that tab you should have the ability to add a new entry. The new entry should contain the following fields (or something very similar):
Destination Network: 10.8.0.0 (This is the subnet for your VPN. In this tutorial we used 10.8.0.0)
Subnet Mask: 255.255.255.0 (This is beyond the scope of this tutorial, but if you followed my example then you will use 255.255.255.0. If your router expects CIDR, or slash notation, it will be /24)
Default Gateway: 192.168.0.2 (IMPORTANT - This should be whatever the IP address is for the Raspberry Pi hosting your VPN Server. Do not just use my example, change it to the IP of your server.)
To set the static route on my router running IOS, I add the following line to my configuration:
ip route 10.8.0.0 255.255.255.0 172.31.0.7
Keep in mind that the information below is meant to be a short summary to give you enough information to configure your router. By no means is this a full explanation of either port forwarding or static routes.
Port Forwarding
In order to understand port forwarding, I first need to explain network address translation, or NAT. Your internet service provider assigns you one IP address, but you likely have many internet-connected devises on your home network. To allow them all to communicate with other devices on the internet, your router uses NAT.
When a packet comes in from the internet it has the IP address of your router, along with a TCP or UDP port number. Your router examines this port number, and determines which internal device should receive the packet. It then forwards it on with the IP address of the internal device and the port number that the device is expecting.
If the communication originates from outside your home network, such as in the case of a VPN connection, the router needs to be told which internal device to send the packet to. This is the essence of port forwarding.
If your home router has a graphical interface, you will likely have a tab named Port Forwarding. On that tab there should be a table with columns for external port, internal IP address, and internal port.
The external port is the port that the packet coming from the internet will have when it reaches your router. This was set in the client configuration file above. In my example I used 3456, but you can use any number between 1024-49151 as long as your client configuration matches the external port on your port forward.
If you followed the configuration examples above, the internal port should be set to 1194, but this can be changed on your server configuration file if you so desire. The internal IP address should be set to the IP address of your Raspberry Pi that is hosting your VPN server.
Once you have entered these settings, you should save your changes, and then apply them.
If you are using a router running Cisco IOS as I am (in which case you probably don't need this tutorial), you should add the following commands to your configuration file (adjusting for your own port numbers and internal IP address):
ip nat inside source static udp 192.168.0.7 1194 interface GigabitEthernet0/1 3456
You will also need to add the VPN subnet to the list of internal NATed addresses. This is not something that 99.9% of you will need to worry about, but this caused me hours of troubleshooting the first time I implemented a VPN, so I feel as if I should mention it.
If your NAT is defined by an access list like so (this access list is named LOCAL):
ip nat inside source list LOCAL interface GigabitEthernet0/1 overload
Then be sure to add the following line to your access list:
permit 10.8.0.0 0.0.0.255
Static Routes
Routes are how a router knows which port to send a packet through. If you have a typical commercial grade home router, your router has two ports, a LAN and a WAN. Before you say "but I have a 4-port router!", or something of that nature, that is only because your router is actually a combination of a router and a switch, and the 4 or 5 ports for local devices are actually switch ports that are all connected internally to the LAN port on your router. But I digress...
Your router has a routing table that has two basic rules: #1 - send all traffic in the IP address range of your home nework (for example 192.168.0.0/24) through the LAN port, and #2 - send all other traffic through the WAN port. Simple enough.
The problem arises when you add your VPN subnet, which in this tutorial is 10.8.0.0/24. By default your router wants to send this traffic out the WAN port because it is not 192.168.0.0/24, but it really needs to go to your VPN server. Adding a static route is how we tell it to do this.
If your router has a graphical interface, you should have a tab named routing table or static routes. On that tab you should have the ability to add a new entry. The new entry should contain the following fields (or something very similar):
Destination Network: 10.8.0.0 (This is the subnet for your VPN. In this tutorial we used 10.8.0.0)
Subnet Mask: 255.255.255.0 (This is beyond the scope of this tutorial, but if you followed my example then you will use 255.255.255.0. If your router expects CIDR, or slash notation, it will be /24)
Default Gateway: 192.168.0.2 (IMPORTANT - This should be whatever the IP address is for the Raspberry Pi hosting your VPN Server. Do not just use my example, change it to the IP of your server.)
To set the static route on my router running IOS, I add the following line to my configuration:
ip route 10.8.0.0 255.255.255.0 172.31.0.7
Firewalls
This section only applies if you have specifically set up a firewall. If you are using a typical home network set-up, or if you are unsure if this section applies to you, it is very likely that it does not apply, and you can just skip to the next section.
If you are using any sort of firewall, either as part of your router configuration, or in the form of a separate device, it will typically block all incoming connections unless you tell it otherwise. In order for any packets destined for the VPN server to get through, you must tell your firewall to allow them, by adding the external port for your VPN to the list of exceptions.
For instance, I use an access list on my router named BLOCK-ALL that I apply to all incoming traffic that did not originate from inside my network. In order to allow packets destined for the VPN server to get there, I need to edit my access list and add the following attribute:
permit udp any any eq 2345 log
Preparing Keys and Client Configuration to Transfer to Clients
At this point we should have everything setup on the server side of things. The only thing left to do is to set-up the individual clients. In order to do this we first need to copy several files to each of the client machines. The files that need to be copied are the client.ovpn, the ca.crt, the dh2048.pem, and the ta.key files, as well as the "client".crt and "client".key files specific to each client. We can transfer each file individually, or we can wrap them all up in a tarball to make for easy transfer, which is what I will do here.
First lets head on over to the directory /etc/openvpn/easy-rsa/keys which contains all the files we need to transfer. This directory is only readable by the root user, so before we will even be able to look inside we will need to sudo su. Once there we will need to create a folder for each client we have created keys for. For the sake of brevity I will only show this being done for one client, and I will call the client laptop1.
sudo su
cd /etc/openvpn/easy-rsa/keys
mkdir laptop1
Now we need to copy all the files we need for this client into the directory we just created.
cp client.ovpn laptop1/client.ovpn
cp ca.crt laptop1/ca.crt
cp dh2048.pem laptop1/dh2048.pem
cp ta.key laptop1/ta.key
cp laptop1.crt laptop1/laptop1.crt
cp laptop1.key laptop1/laptop1.key
Once we are finished the following command will wrap it all up in a nice little tarball for us.
tar -czvf laptop1.tar.gz laptop1
Lastly we need to move the file to the home directory for the user Pi, and then exit out of the root user.
cp laptop1.tar.gz /home/pi/laptop1.tar.gz
exit
Repeat the same steps for all clients you have created, and then we will move on to copying the files to the clients.
Transferring Client Files to the Clients
There are many ways to transfer files to the individual clients, and the methods used will depend on several factors, such as operating systems, interfaces, and whether the clients have access to the same network as the server.
For Windows and Linux computers that can be temporarily put on the same network as the server, such as in the case of laptops, the easiest way I have found to transfer the client files is SCP. SCP is a file transfer protocol that uses SSH protocol for data transfer. If you are not familiar with SCP, you can follow this link to a short tutorial I wrote on how to use SCP with both Linux and Windows.
Another way to transfer the client files is with a USB flash drive. If that is not an option for one of your devices you can always email the files.
If you have an Android device then you have a Google account by default, so you can always upload the files to Google Drive, and then pull them down onto your Android phone or tablet. Alternatively you could just pull out the SD card, stick it in an adapter, and plug it directly into your Pi in order to copy the files to the card.
If you have an Android device then you have a Google account by default, so you can always upload the files to Google Drive, and then pull them down onto your Android phone or tablet. Alternatively you could just pull out the SD card, stick it in an adapter, and plug it directly into your Pi in order to copy the files to the card.
Since there are so many options for file transfer, I will assume you will be able to find a way to get the client files onto your client device. If you are having difficulty transferring files onto one of your devices, please let me know in the comment section below and I will do my best to assist you.
Once you have transferred all of the tarballs out of your home directory, it is good security practice to delete them. You still have the original copies in the folder /etc/openvpn/easy-rsa/keys if you ever need them again, and that folder is limited to be accessed by the root user only, so they are safer there.
Extracting the Client Files and Installing the Client
This process is going to differ depending on the operating system, so I will layout procedures below for Linux, Windows, and Android.
Setting up the Linux Client
First we need to install OpenVPN, which can be done easily since it can be found in the repositories. For Debian-based flavors of Linux such as Ubuntu or Raspbian use apt-get:
sudo apt-get install -y openvpn
Alternatively, if you are using Red-Hat based Linux such as Fedora or CentOS, you will need to use yum:
yum install openvpn
Now extract the files into the /etc/openvpn directory (the command below assumes the name of the file is linuxclient.tar.gz, and you are in the directory that contains the file. Obviously it is unlikely your file is named linuxclient, so change the file name accordingly):
sudo tar -xvzf ./linuxclient.tar.gz -C /etc/openvpn/
If you followed my directions regarding compression earlier, then your files are extracted into a directory with the same name as your compressed file, inside the /etc/openvpn directory. In this example that would be /etc/openvpn/linuxclient/ We now need to go there and edit the client configuration file named clinet.ovpn.
cd /etc/openvpn/linuxclient
sudo vim client.ovpn
You will now need to navigate down through the file until you see the following section:
ca ca.crt
cert client.crt
key client.key
and change it to point to the full path of the files you just unzipped. We also need to add a line to point to the Diffie Hellman parameters. To use the name of the folders in this example, this section would now look like this:
ca /etc/openvpn/linuxclient/ca.crt
cert /etc/openvpn/linuxclient/linuxclient.crt
key /etc/openvpn/linuxclient/linuxclient.key
dh /etc/openvpn/linuxclient/dh2048.pem
The last thing we need to do is to continue to scroll down until we see the HMAC key, which looks like this:
tls-auth ta.key 1
and change it to point towards our imported HMAC key, which should look something like this:
tls-auth /etc/openvpn/linuxclient/ta.key 1
And that should do it for the client configuration file. Go ahead and save your changes (:wq if you are using vim), and lets try it out.
To connect to our VPN, we will simply need to use the command openvpn followed by the name of our configuration file, which, if you followed this tutorial, should simply be client.ovpn. Since we should still be in the folder that contains the file, the command should simply be:
openvpn client.ovpn
And that's it, you should see the client connect. I like to keep this running in the foreground of the terminal, and just open a new terminal if I need to. That way when I want to close the VPN session I can just return to the terminal that started the session and use [Ctrl]-C to close the connection.
There is one last thing that I would like to recommend. To avoid having to navigate to /etc/openvpn/linuxclient/ every time you want to connect to the VPN, or having to type out the full path, we can save some time by copying the config file to our home directory. I would also recommend making the file hidden by preceding it with a period like so:
cp /etc/openvpn/linuxclient/client.ovpn ~/.client.ovpn
You can now start a VPN session from anywhere with the following command:
openvpn ~/.client.ovpn
Just a quick note, make sure you are not on the same network as your VPN server when you are testing this out. Often people want to test the connectivity as soon as the files are transferred and the client is set up, but if you test from inside the network where your server resides you will have connection issues.
Setting up the Windows Client
For Windows we will need to download the OpenVPN client from the OpenVPN Community Downlads page:
https://openvpn.net/community-downloads/
Just grab the installer, which is the .exe file, and run it to install the OpenVPN client.
While we are downloading stuff, we will also need a program to unzip our tarball that contains our client files. I like to use 7-Zip, which you can download from the following website:
https://www.7-zip.org/
Let's also download Notepad++, which will make it easier to edit the config file than if we tried to do it with regular old Notepad. You can download the installer from their downloads page at:
https://notepad-plus-plus.org/download/v7.6.4.html
Now that we have all of our software downloaded and installed, let's get down to business. Find the tarball file containing the client files that you copied over to your Windows computer. It should be named something like windowsclient.tar.gz, except instead of "windowsclient" it will be whatever you decided to name this client. For the rest of this section, anytime you see "windowsclient" replace it with the name of your client.
To unzip the file, right click on it, hover over 7-Zip > and then select Extract Here from the sub-menu. This will create a file named windowsclient.tar. We now need to unzip it one step further, so right-click on the new file, and again select 7-Zip > Exrtract Here. This time you will end up with a folder named windowsclient that contains all the files you copied over from your OpenVPN server.
Open the folder windowsclient, and put it to the side. Now open a new File Explorer window and navigate to This PC > Windows (C:) > Program Files > OpenVPN > config. Now select all of the files in your newly created folder windowsclient and drag them over to the OpenVPN > config folder. Once all the files are moved over, you can go back and delete the files windowsclient.tar.gz, windowsclient.tar, and the now empty folder windowsclient, just for good housekeeping.
Now that we have all of the required files in the OpenVPN > config folder, we need to edit our config file. Right click on the file named config, and select Edit with Notepad++. Scorll down until you see the following two lines:
user nobody
group nobody
and add a pound sign at the beginning of each line so they look like this:
#user nobody
#group nobody
Continue to scroll down until you see the lines referring to your certificates:
ca ca.crt
cert client.crt
key client.key
You will need to edit these to point to the full path of the files you just copied over. This is a little tricky in Windows because Windows uses both spaces and back-slashes in addressing, and OpenVPN doesn't like either of these, so we need to use an escape character, which is also a backslash. If you have no idea what I just said, don't worry, you can just copy and paste the section below over the section referenced above, and change the words windowsclient to the name of your client.
ca C:\\Program\ Files\\OpenVPN\\config\\ca.crt
cert C:\\Program\ Files\\OpenVPN\\config\\windowsclient.crt
key C:\\Program\ Files\\OpenVPN\\config\\windowsclient.key
We will need to do the same thing to the line for the HMAC key, which looks like this:
tls-auth ta.key 1
and needs to look like this:
tls-auth C:\\Program\ Files\\OpenVPN\\config\\ta.key 1
That should be it for the config file, so go ahead and save the file, and close Notepad++. You can also close all of you File Explorer windows or browsers you still have open.
Now let's try to connect. Go to your system tray, which should be located in the bottom right hand corner of your screen, and look for an icon that looks like a monitor with a lock in front of it (you may have to click the up arrow in the system tray to see all of the icons). This is the OpenVPN icon. Right click on it and select Connect.When you are done with your session, you can go right back to the system tray icon, right-click, and select Disconnect.
Just a quick note, make sure you are not on the same network as your VPN server when you are testing this out. Often people want to test the connectivity as soon as the files are transferred and the client is set up, but if you test from inside the network where your server resides you will have connection issues.
Setting up the Android Client
For Android, we will need to download the OpenVPN client from the Play Store. Simply search for OpenVPN, and the first search result should be OpenVPN Connect, by OpenVPN. This is what we want, so go ahead and install it.
While we are in the Play Store, we will also need to grab a text editor. I am going to use "Simple Text Editor by MaxiStar. I just picked this one at random and it seems to work well enough, but if you use another one you like better, by all means use it instead.
Lastly, we will also need something that can unzip our tarball. For this I use an app named 7Zipper. Go ahead and install it as well.
Now that we have all our apps installed, the first thing we need to do is unzip our tarball. For this tutorial we will refer to the file as androidclient.tar.gz, but your file will actually be whatever you named your android client. Going forward, anytime you see the words "androidclient", replace them with the name of your client.
Go ahead and open up the 7Zipper app. If you copied your tarball to your SD-card then select SD Card and navigate to your .tar.gz file. If you downloaded it from your Google drive, then you can find it under Download. Once you find the file, tap it, and 7Zipper should automatically get ready to extract the file, and should ask you for a target folder.
I like to put my folder in /sdcard so it is easy to find, but you can put it anywhere as long as you can find it later. To select /sdcard, tap the drop-down-menu, and then select Root (which is represented by / ). Now scroll down until you see the folder named sdcard, and select that. Make sure you have unchecked the box next to (Create Folder), and tap OK.
If you haven't done so previously, you may need to grant 7Zipper Write-access, and if so, you may find that you need to tell it to extract the file again after Write-access is granted. Don't worry, the second time is the charm.
Now that your files are extracted, you need to edit the config.ovpn file, so go ahead and open your text editor. If you are using Simple Text Editor, tap on the menu icon in the upper right hand corner, and select Open. You will then need to navigate to the file. If you stored in /sdcard like I did, then you will need to use the back button until you get to the directory / , then tap sdcard, find the folder with the name of your OpenVPN client and tap it.
Inside the folder with same name as your client you will have a file named client.ovpn. Tap in it to open it in the text editor. Scroll down until you find the following three lines:
ca ca.crt
cert client.crt
key client.key
All we need to do is to change the second two lines to represent our own client's name, and then add a fourth line for our DH parameters. The lines should look similar to the following, with the name of your client instead of androidclient:
ca ca.crt
cert androidclient.crt
key androidclient.key
dh dh2048.pem
That's the only change we need to make. Go ahead and save the file, and then close your text editor.
The last thing we need to do is to point the OpenVPN Connect app to our client file, so go ahead and open up OpenVPN Connect.
You will be presented with three options, and you want to pick the third, which is OVPN Profile. You will then be taken to a screen that says Import Profile, where you will need to navigate to your client.ovpn file. At the top of the navigation menu, there should be a button that says back. Click it until you can't go back anymore, and you should only have two options: Internal Storage and SD Card.
I know this will sound confusing, but just trust me: if you saved your files in a folder inside /sdcard, do not select SD Card, instead select Internal Storage. Scroll down until you see a folder with the name of your client and open it. Inside should be the file named client.ovpn. Tap it, and a checkmark will appear next to it, then select IMPORT. The next screen should have a field named Title, and it should be auto-populated with your ddns address from your config file. Click Add, and you are done.
You should now be presented with a screen titled OVPN Profiles, which is where you will now be taken when you open OpenVPN Connect. You will see your one profile listed, and it should say DISCONNECTED. To connect, tap the toggle button to the left of your profile. It's as easy as that. To disconnect, tap the toggle button again.
Conclusion
Phew, that's it! Wipe the sweat from your brow, you are done. Are you tired of reading? Because I'm tired of writing. I hope you enjoy your VPN server, and I hope this tutorial made setting it up a little easier. If you have any questions, comments, or recommendations for improvements, please leave them below in the comment section.
Until next time, have fun, and keep building!


 , which utilizes an Atheros AR9271 chipset. There are probably better WiFi adapters I could have used, but I purchased this adapter years ago, specifically because it could be put into monitor mode, and the driver came preinstalled on Kali Linux. Conveniently enough, the driver is also included with Raspbian Lite, which is the OS I will be using. If we want to make this rig portable, we can't forget the
  as well.
 , but even with Prime 2-day shipping, I didn't have the patience to wait on it to arrive, so I redesigned the project using a Pi model 3B. With the Pi 3B I can use the Ethernet port and a cross-over Ethernet cable to connect my laptop to the Pi, so no level shifter is required, and the Wifi adapter can plug directly into one of the 3B's female USB-A ports. Bottom line, I ended up using a more expensive Pi, but saved some money on adapters, so based on cost there is little difference between the designs.


 . In addition, I was going to need an
  . Finally I decided to add an
  inside the birdhouse so I could ensure that all the electronics did not cause the temperature inside to get too hot.
 made sure everything stayed in place. I allowed the temperature sensor to hang slightly below the rest of the electronics to allow it to measure the temperature closer to where the birds would be nesting.
 , because of it's much lower price point, and it's smaller size. I purchased it in a